Saturday, June 30, 2012

Finally made some things.

It's been way too long. Here are my recent projects.

A quillow for the baby girl of some friends, commissioned by another friend! We gave it as a joint gift.


Another quillow - this time for my nephew, and I appliqued 2 previous J's before I did this one and was happy with it. I will make him something from the practice attempts, but didn't want to put a mediocre one on a quillow. I have only made a patchwork / applique pocket once before, and  I am definitely going to keep this idea going, although it takes much longer to make a quillow that way. An extra evening (or in this case, an extra 2 evenings!).


Finally, another waldorf inspired doll, for Little Miss Joy's first birthday, but I will do a separate post for that one. :)


Friday, March 23, 2012

Housewarming Quilt - quick job!

I am afraid that progress with the Nightdresses Memory Quilt has halted. The Lemoyne Star "Space Ranger" quilt is...not yet quilted. I am a proud owner of a number of UFOs.  Or UFQs. Ok not so proud. Unless having a number of projects on the go make me an official Quilt Geek. (How much experience do you need before you are a Quilting Geek?).

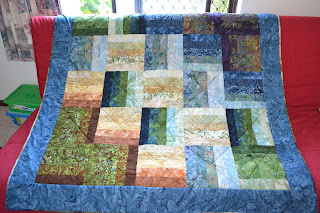
Anyway, SIL was moving house, buying her first place, and I had a jelly roll crying out to be made into a housewarming present. Not an official  Moda Jelly Roll but actually a Hofffman's Bali Pop (Mint Choc Chip, to be precise). It was part of my birthday present 2 years ago and it's so hard to decide what to do with them! I've made different designs in my head but in the end doing a version of the Midnight Mystery Quilt (MMQ) won out on a time basis. Because I made it in October and was proud new mummy to Little H#5. She helped. (Picture below).


Here is Little H-Joy, 3 months old. Helping. At that age, sleeping while I sew in my middle of the afternoon "downtime" is very helpful. ;)

I can't find the picture of all the strips laid out one afternoon in my living room so the only "process" photo is all the squares laid out on my bed. I trried to categorise the strips by colour (instead of having contrasting strips making up the squares as I'd done with the MMQ). Finding a layout for them was tricky but I got there in the end.


We've moved house since I last quilted so no lovely wooden floor to baste and quilt it on, but I managed on the kitchen floor.


Here's the finished quilt. I bought some batik for the border, and I was mighty pleased with my brainwave for the binding. I love binding quilts, once I have actually made the binding. I sliced the squares and sewed the lengths together and made a binding from them. Just love it. Worked really nicely although I could probably have given it a little extra width but I managed to bind it nicely and am really pleased with the result (you can see it quite nicely in the folded pic).


Folded. You can just about see the label with our family picture and a personal message. I don't really want to close up on the label because it has personal details on.

Presentation of said quilt to lovely Auntie S.

It looked really good on her chair - the chocolate covered leather went really well with the colours of the quilt. Coincidence. :)

Saturday, May 14, 2011

Progress with the Nightdresses!!

Close up (ish) of my plans so far!
I have decided that the "star" in the 4th block - as yet white on the plans because I don't know how many of the other blocks I can make - will contain a point from 4 each of the nightdresses, and a white patterned border. I am waiting to confirm this after seeing how much I have and how many of the other blocks I can make. I want to make minimum 4 each of the first 3 blocks. I can play around with borders etc if I have that many, and still get away with a Queen sized quilt, I hope.


Overtaking the kitchen table - cutting, fusing, calculating numbers of triangles and squares I have enough to cut so far


Fabric looking more like...fabric...
 This is the result of my first night's measuring and cutting. I ended up being able to buy a roll of fusible web stabiliser for $9. It was a 10m roll and the lady at Spotlight suggested it instead of what I was about to buy following a chat with her, and she saved me some money. I'm glad about that because I also had a look at the queen sized wadding packages and they're not cheap... plus I think it will need to be professionally quilted to do it justice when I've finished... will see about that. I need to try to finish the quilting on the single bed sized quilt I have made (Spaceranger) and from which the idea for this quilt top has come.

I didn't fuse the pink fabric, but it was starched as I went, and I *think* it will be ok not backed. It's going to have to be I think unless when I start to sew it looks shocking in which case I will carefully have to back the strips and even more carefully cut them back out again. I don't think they will be accurate enough if I do that.

Backing the white fabric (the absolute thinnest and worst quality in sewing terms of all the dresses bar the other white pattern) I discovered that cutting the strips slightly wider, then backing them, then trimming them to the width I wanted was the most accurate way of getting the strips right.

The strips I am cutting are 3 1/2 in strips for the corner squares, and 3 7/8 in strips for the triangles. I've tried this both ways with triangles - first time I did le Moyne Star (first memory quilt) I was advised by a quilt shop assistant to cut them to 4in, and then do the triangles, and then trim to size at the end. This allows for problems with accuracy. But I am accurate when I sew and actually I just found this frustrating and more work. So the next Le Moyne I did (Spaceranger, as yet a UFO ha ha) I cut them exactly to 3 7/8 and the blocks were perfect. Am hoping they will be something like that again. ;)

I've since (because blogger's been down) cut some more and backed some more... and now the green fabric has been transformed into strips of 3 1/2 in and 3 7/8 in. I have labelled the strips on scraps of paper, measuring how many squares I can cut out of each strip (because of course the strips are not uniform length having originated from nightdresses rather than a nice roll of fabric!) and pinned the information. I am keeping a record of how many squares and triangles I can make from each one. I will then sit down and work out how many blocks  I can make. It seems a bit Heath Robinson to work it out as I go along like this but as I am not working from a pattern that tells me how many squares and triangles I need (and even if I did know that, I don't actually know how many each nightdress will yield).

I will decide on the border widths and fabrics once I have made the blocks and discovered how many I can do. I am hoping for 20 blocks, 4 across, 5 rows, and then thin borders between them, larger border round the edge.

Now I have the strips nicely starched, backed and pinned with the papers - they 'look' like fabric now and I am actually looking forward to cutting and piecing the blocks. It really has transformed the fabric and reassured me that I have enough (which I was worrying about).

I am reserving judgement on the bridesmaid dress. I had thought, looking at my plans, it might make an acceptable border, with the red section being the squares pieced into the border. But I looked at the dress again last night and I am just not sure. My neighbour is a dressmaker. When I have the blocks made I will lay them out with her, get her opinion on whether I should cut up the dress and use it or not. I don't want to cut it up and not use it!!!!! Wouldn't care if it was mine, or Op Shop in origin but it's a sentimental garment and does not deserve that treatment!

So my progress and process is charted. Nice to keep track of a project in this way, and actually it is helpful in keeping me accountable to making progress. I am working on it daily at the moment, in the evening. I will retreat back to the sewing room when I've done the cutting but for now, I need the bigger table, ironing board, and am enjoying the company with Matthew while we watch replays of Australian Masterchef on the computer. Can't abide the adverts so we are watching it online after the episodes have been put up.

Thursday, May 12, 2011

Research

I asked on a forum for advice about stabilising the night dresses for the quilt. I had a reply helpfully suggesting that I go for a lightweight knit fusible stabiliser.

Now I just have to find one. I am going to ring around today but I just googled and found this very useful page on Pellon stabilisers:

http://www.pellonideas.com/SubSections/Interfacings_Apparel.aspx

Very helpful resource, actually, gives me some different options to ask for. And something else to google! I am just hoping it isn't too expensive.

Wednesday, May 11, 2011

Branching out. Maybe.

I am attempting to make one of these: Wool nappy cover

I have never felted anything before, so I have thrown one of Matthew's jumpers in the washing machine, and am hoping for the best. Well actually years ago I felted a lovely pink Next cardigan (or my mum did) but I wasn't in the know enough to know at that point that it could make some beautiful craft. So the first attempt will be (hopefully) blue felt. But I am vain enough to want to dye it a more girly colour for Little Miss August 2009 if it works.

Time will tell.

Tuesday, May 10, 2011

New Project...

I've been procrastinating, partly, before beginning this next new project. It's going to have to be "design as I go" to some extent because I am upcycling, to coin a term, clothes into a memory quilt. It is for a friend of a  friend. The fabrics are predominantly patterned nighties of her late mother, 2 PJ tops of (I presume) her children, and a bridesmaid dress.

So it's a challenge, for sure. I have been thinking about how to do this for some time, and have settled on Le Moyne Star, mainly because I have done that block a couple of times before, and I think it will work ok for the nighties, as I've already done it out of mens' shirts before for my first memorial quilt.

I'm not sure, as yet, how to use the bridesmaid dress - originally there was a design I fancied using that did ask for a silk to go on the blocks. My issue with this is that the quilt was a bit too small to be useful and I think the recipient really has a bed quilt in mind.

So this is going to be my first "Quilt Process" pledge project. I'm going to be a while making it, perhaps, and it is interesting (and brave) to track it as I go along.

First photos are the original clothes I am working from, then the fabric  and buttons, lace and ribbon I am left with after cutting the seams open and harvesting the fabric and buttons last night.


Planning stage:
  • So now I am using graph paper and trying to work out the design and how much fabric I have.
  • I also need to research how to stiffen the fabrics I am working with. The fabric is (unfortunately) poly cotton, emphasis on the poly! My experience with the shirts tells me that simply starching this fabric isn't going to be enough. The poly cotton shirts were terrible to work with.
  • The other reason I need to do something to the fabric is that especially the white fabric is very flimsy and will be somewhat transparent - it will show the seams, the batting, and just needs a denser white behind it. I am hoping that this isn't going to prove too expensive. I am going to have to find some sort of iron-on solution - interfacing?
  • The bridesmaid dress is offwhite - not fantastic seening as 2 of the nighties are white based patterns. I also don't know how to use the red without totally drowning the quilt. Mmmmm quite a challenge then.
  • The little PJ shirts will probably have to make tiny squares to go within the border. I am thinking the bridesmaid dress ivory fabric ought possibly to be used in the border.
  • I may have to buy a co-ordinating quilt fabric to make the materials go further. And probably for the border / definitely for the backing.
  • The finished quilt will have buttons on it in some form, and I'd also like to use the little ribbons I cut off last night when I was beginning the fabric preparation.
Next post - early planning pics.

Not that I am taking the pledge too seriously but it is important in this case I think for me to keep track of my planning, and possibly interesting for someone else to see how I work. I am totally self taught so have no idea whether there are better ways of doing these things.

This quilt is to celebrate life. Family life. Remembering a loved one and joining with the present. It's what Sew La Vie came from - a real burden for Life. I'm praying I can do a good and fitting job to bless a dear friend's dear friend...

Saturday, May 7, 2011

Are we there yet??!

I had an idea for Mother's Day for MIL and produced this quilted photo last week. I finished it today by adding a label on the back.

It is called "Are we there yet?" because that is the book LittleH#1 was reading to his sibs in the photo - a lovely photo of them all together, and Grandma and Grandpa are just about to go on their own little adventure seeing a bit of the outback, so I hope the choice is a good one.

It was the first time I have attempted mitred borders, and I am pleased with the end result, though there were a few tears last week and I "rang a friend" (well, friend's mum) but in the end I worked it out myself and managed it. I kind of kick myself when I try out something new on a project I need to get right the first time but it's my personality. I don't practise much in life, I tend to like to try to do it for real the first time, and want to get it right. I don't really have enough time anyway to spend sewing things that aren't actually going to turn into things, if that makes sense!

So, I finally cut into my stash of fat quarters that came free with a magazine subscription, they've been tempting me for some time. I puzzled over how (and whether) to label the back but decided it was important and in the end bought some new fabric pens, and used leftover border to make a border for the quilt label. I am as pleased with the back of the 'photo' as the front! I did google for ideas but (although I doubt my project is amazingly original) could find nothing similar on the internet so I just decided on the size and design myself. I am really pleased with how it's turned out, a nice "different" thing to do with a photo, instead of sticking it on a mug like everyone else. Nothing wrong with mugs but I can't compete in the photo stakes so am not trying. :) Maybe if I make a few more of these (my mum's next on the list!) I will begin to be able  to justify a new camera. Although the quality of my sewing photographs probably in itself does justify a new one...